Tuesday, August 12, 2008

Make multiple cards in a hurry

I could spend a full day creating a card! Sometimes that's not the best use of my time, so instead I might throw a whack of stuff on a large sheet of card stock (which you can buy from your local friendly printer but not just any copy shop) then chop it up & glue the pieces on. I keep a stack of 8 1/2 x 11 card stock handy ready to cut in half for 2 cards; folded to 4 1/4" x 5 1/2".

This started as a 22"x35" blank sheet. I initialy worked on top of this paper while creating other cards. All the turquoise images are from the stamps I used on Sheri & Ian's card. (See previous posting below) Why waste all that nice ink? Here's the how-to:
  1. Stamp your stamps clean on large sheet of cover weight card stock.
  2. Scatter written words throughout; I used ruling pen & brown walnut ink for lettering large-they're pretty forgiving. Try sprinkling a metallic powder like Schminke over small areas of still-wet ink. A hint from Lisa Engelbrecht is to cover the jar opening with nylon pantyhose, wrap elastic band to hold in place. This ensures you'll get a sprinkle of powder, not a clump. You can still put the lid on when you're done if the elastic's far enough down.
  3. Overlap multiple stamps using various colors dye or pigment stamp ink. I just love Suzanne Cannon's new flourish stamps @ http://www.quietfiredesign.ca/. Tiny curlicues make great fillins.
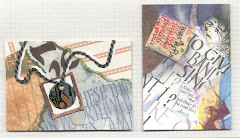
Now it's just a matter of cutting the sheet into smaller pieces & using them as the focal point on plain card stock. Double-sided adhesive tape works well.
Suzanne also has instructions to make the frame cards, which are really cool because you can see your message through the window, which takes care of "Now...what should I do on the inside". Here are the instruction for making window frame cards: http://www.quietfiredesign.com/Galleries/Projects/PinnedBackFlapsKristy.htm

Get your card layouts galore

There are days when you realize you need to make a card TODAY!...and you're just not in the mood to play (horrors).....where to start?

I stumbled on this site where you can get a new lay-out each week; what a great idea! check it out at
http://janellerichmond.typepad.com/sketchthis/

You'll also find the creations of others, using that particular lay-out, if you have time to browse. And there's http://janellerichmond.typepad.com/photos/sketchthis_layout_sketche/index.html

if you prefer to have all your layout choices "lay"ed out before you.
OK, I'm no longer stumped!

Tuesday, August 5, 2008

Calligraphy dust

After all that blogging, unloading the trailer from a weekend Antique Car Tour in the Rocky Mountain House area, hanging sleeping bags out to air & finishing a birthday card for Laurie who's (ahemmm) 39 she says, it looks like the house could use a bit of dusting. I say a bit, cause a lot would be too overwhelming, so why even bother to start.

Could this be why the boys have allergies?
Well, can't say I never gave them anything!

Sheri & Ian's wedding

I love how Sheri & Ian sent luggage tags as their Save The Date notices. Doesn't this just make you wanna hop on a plane & get out there, NOW? I know it's going to be fun. Their invitation is just as cute, with a Lemony Snicket phrase on the front


"One of the remarkable things about love is that despite very irritating people writing poems and songs about how pleasant it is... it really is quite pleasant".


I used this and their chosen colors as the basis for their wedding gift, which is on 8x10 Arches wc paper. That quote was written with Sakura Glaze pen, their names with ruling pen & walnut ink with metallic added later which actually came out a little 3-D so I was happy about that.


I was going for the whole "Let's not make this another nice flat piece with some nice flat writing on it... let's see some depth & pizazz to it!" The brown ribbon, copper sticky-backed tape (from my stained glass TRIAL period 29 years ago...when I tried to halve a full sheet of glass, which ended when I crawled up from the basement & drove my pregnant self in my little green Honda to the Foothills Hospital for stitches on 3 fingers).


Oh yeah, found the raised embossed love hidden in my paper files and stuck on some thread, plastic sticky-backed squares & little stars and with pointed pen wrote the Elizabeth Barrett Browning quote
"I love you not for what you are...but for what I am when I am with you".

I think they'll like it.

Love on the eighth


I thought June was the month for weddings, but in my studio it's carried on into July and August.
On the left is a card for Sheri & Ian, whose wedding date will be 08-08-08!
I created the word LOVE in Kersals and photocopied it on various white papers. This particular one is 80lb Silk Text. Then I took watercolor pencils and water to it to add a little color, cut the word out, glued the back with a glue stick, and used the rubber roller to smooth it onto the card. Then used a pointed nib & ink to finish the flourishes & write their names.


The vellum envelope is shown with then without the card inside. The envelope is decorated primarily with my own carved letter stamps. The smallest lettering for their street and city are stamps I bought at Michaels-$1.50 for each alphabet! In the bin near the cashiers.
They're so cute!
the stamps, not the bins, or the cashiers.


Happy day, Sheri & Ian!